](https://file-host.link/website/utahclosetconnection-jny8ww/assets/blog-images/3f80490c-ed81-4df3-8833-1ed7d06c5fb9/1784147346098371_19a83a74179646b39f5fa858a2458c51/360.webp)
The concept is straightforward. The execution is not always. Storage type, floor levelness, HVAC vent locations, and framing approach all determine whether your bench looks custom-built or cobbled together. This guide walks through every stage — from layout planning to the final coat of paint.
Key Takeaways
- Window seat height runs ~18 inches including cushion; depth ranges 16–20 inches for most residential spaces
- Storage access options: lift-top lid (easiest), pull-out drawers (most functional), cabinet doors (cleanest look)
- Always locate floor vents and wall studs before building — both affect framing decisions
- DIY material costs typically run $1,200–$1,600; professional custom installs average around $2,500
- Choose 3/4-inch plywood for the box frame and face frame — thinner stock won't hold hardware or weight reliably
Planning Your Window Bench: Dimensions, Location, and Storage Design
Sizing It Right
According to This Old House, a residential window seat sits at about 18 inches high including the cushion, with a cushion accounting for 2–4 inches of that height. Depth falls in the 16–20 inch range for comfortable sitting without needing to lean against the window.
Width is where personal preference takes over. Most builds land between 40–64 inches. Narrower than 40 inches and you lose the lounging quality that makes a window bench worth building. Wider than 64 inches and the space starts to feel like a platform rather than a nook.
Choosing Your Storage Mechanism
Each storage type suits a different use case:
| Storage Type | Best For | Complexity |
|---|---|---|
| Lift-top lid | Seasonal items, bulky storage | Low — needs piano hinge and support ledger |
| Pull-out drawers | Daily-use items, organized access | Medium — requires drawer slides and face frame |
| Cabinet doors | Taller benches, built-in aesthetics | Medium — cleanest finish, more framing |
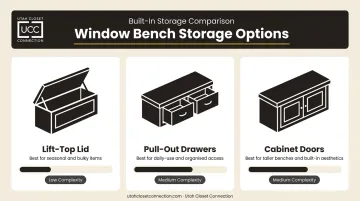
For a first build, the lift-top design is the most straightforward option — it requires no drawer slides, no face frame, and only a piano hinge beyond standard lumber. Once you've settled on a storage type, run through the pre-build checklist below before picking up a saw.
Pre-Build Checks
Before cutting anything, run through this checklist:
- Find your floor's high point using a long level — this becomes your reference height, not the average floor level
- Mark stud locations on the wall behind the bench; ledgers must hit studs to hold weight
- Measure window casing and baseboard trim, both affect your finished width and how trim integrates
- Locate any HVAC floor vents inside the planned footprint — these need a redirect plan, not just coverage
- Sketch the layout on paper or use painter's tape on the floor before committing to cuts
What You Need: Tools and Materials
Tools
- Tape measure and 4-foot level
- Circular saw or track saw (sheet goods cuts)
- Jigsaw (lid cutouts, notches)
- Drill/driver
- Pocket-hole jig (Kreg or equivalent)
- Miter saw (trim and face frame pieces)
- Brad nailer or nail gun
- Stud finder
- Sander
Materials
Structural
- 3/4-inch cabinet-grade plywood — box sides, bottom, top panel
- 1/4-inch plywood — back panel
- 2×4 lumber — base frame
- Pocket screws and wood glue
- Shims
Storage Mechanism (pick one)
- Piano hinge + lid support stay (lift-top)
- Soft-close drawer slides + 1/2-inch plywood for drawer boxes (drawers)
Finish
- Solid poplar or MDF for face frame and nosing
- Wood filler, sandpaper (100, 150, and 220 grit)
- Primer and semi-gloss paint — Benjamin Moore recommends semi-gloss for cabinetry and high-use surfaces
How to Build a Window Bench With Hidden Storage
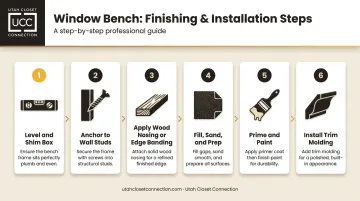
Step 1: Measure and Mark Your Layout
Measure the full window opening width, floor-to-sill height, and the installation zone depth. Set your long level flat on the floor and slide it across the area — find the high point and mark that elevation on the wall. This mark becomes the top of your framed base, not an average or eyeballed height.
Run your stud finder across the back wall and mark every stud. All rear ledgers and stretchers need to land on studs.
Step 2: Build and Anchor the Base Frame
Cut 2×4s to form:
- Front base plate, screwed to the floor flush with the planned bench front edge
- End vertical studs at each side, with rear studs secured to wall studs
- Top horizontal 2×4 across the front, connecting the verticals
- Rear ledger board along the back wall, screwed into wall studs
Keep total frame height around 10–12 inches to leave room for the plywood box and cushion above. Check level across all planes before proceeding.
Step 3: Address HVAC Vents and Electrical
Floor Vents
Lennox's guidance confirms that blocked supply vents increase static pressure and can cause equipment wear over time. Don't cover vents — redirect them. Build a channel using framing lumber and rigid foam board wrapped in foil tape that routes airflow to a louvered grille cut into the bench front.
Electrical Outlets
The 2021 IRC (Section E3905.10) requires that junction boxes and outlets remain accessible without removing building structure. If an outlet falls inside your bench footprint, call a licensed electrician to relocate it before enclosing the wall.
Step 4: Build the Cabinet Box
Cut your 3/4-inch plywood into:
- Two side panels
- One bottom panel
- Internal dividers (if building multiple bays for drawers)
Cut a 1/4-inch back panel sized to fit flush to the rear of the assembled box.
Assemble sides, dividers, and bottom with pocket screws and wood glue, with pocket holes oriented toward the interior or floor. Add a full-length rear stretcher across the back interior. This ties the sides together and gives you a fastening point to anchor the bench to the wall through the back panel.
Step 5: Install Your Storage Mechanism
Lift-Top Lid
- Cut a 3/4-inch plywood top panel to fit the box opening
- Attach a continuous piano hinge along the rear edge
- Add a lid stay or support arm so the lid holds open safely
- Overhang the front edge slightly past the face frame for a clean reveal
Pull-Out Drawers
- Build a face frame from solid poplar, with stiles and rails covering all plywood edges
- Mount drawer slides to interior plywood panels; keep slides parallel and level using a spacer jig
- Build drawer boxes from 1/2-inch plywood; attach decorative fronts after boxes are installed and adjusted for consistent reveal
Step 6: Finish the Exterior and Install
- Set the box on the framed base; shim until level
- Drive 3-inch cabinet screws through the rear stretcher into wall studs (use washer-head screws, not drywall screws, which can snap under load)
- Apply solid wood nosing to exposed plywood edges (glued and clamped) or iron-on edge banding
- Fill fastener holes with wood filler; sand with 100, 150, then 220 grit
- Prime all surfaces and apply two coats of semi-gloss paint
- Install baseboard trim at the floor transition; add shoe or crown molding where the bench meets flanking cabinetry
Common Mistakes to Avoid
Skip the floor-level check and you risk a bench that rocks or requires so much shimming the base frame loses stability. Always identify the floor's highest point first and use it as your reference height.
Cover a floor vent without redirecting it and you create a ventilation problem. Per EPA indoor air quality guidance, blocked vents can contribute to moisture buildup and poor air circulation. A louvered grille in the bench front costs a few dollars — far less than an HVAC service call.
Treat structural elements as optional and the bench will show it within a few years. The rear stretcher, stud-anchored ledgers, and internal dividers carry real load — people sit on these benches in groups and pack them with heavy storage. Cut any of those elements and sagging or shifting is almost inevitable.
When to Consider a Custom Built-In Instead of DIY
A straightforward rectangular space is where DIY shines. Once the project gets more complex, the cost of mistakes — wasted materials, poor fit, redone work — starts to outweigh the savings.
Signs you may be better off with a professional:
- Bay windows with angled facets — mitered box joints and angled face frames require precision joinery most DIYers don't have jigs for
- Non-square corners — out-of-plumb walls and uneven floors compound into fit problems that are hard to scribe accurately
- Integration with floor-to-ceiling cabinetry — matching door styles, reveals, and finishes across a large wall requires consistent production, not one-off cuts
- Permit-required trade work — if HVAC or electrical relocation is involved, a contractor-managed project handles permits and trade coordination directly
If any of those scenarios apply, the project scope has likely moved beyond weekend DIY territory. For Utah homeowners looking at a more involved built-in — whether that's a bench integrated with flanking bookcases or a full wall of cabinetry — Utah Closet Connection designs and installs custom built-in storage systems across Salt Lake County, Utah County, Davis County, Weber County, and Summit County. With over 50 years of combined experience, they offer a free design consultation and back every installation with a lifetime workmanship warranty.
Frequently Asked Questions
What is a built-in window bench called?
A built-in window bench is most commonly called a window seat. When it includes storage underneath, it's also referred to as a storage bench or, in dining contexts, a banquette.
How much does a built-in window bench cost?
DIY material costs typically run $1,200–$1,600 for an average project. Professional custom installations average around $2,500, with Angi reporting a range of $500–$8,000 depending on size, materials, and storage complexity.
What type of wood is best for building a window bench with storage?
3/4-inch cabinet-grade plywood (birch or maple veneer) is the standard choice for the box structure — strong, stable, and takes paint well. Face frames and trim pieces are typically solid poplar or MDF, both of which paint cleanly with minimal grain telegraphing.
How deep should a window bench be for comfortable seating?
16–20 inches is the residential sweet spot. Shallower than 16 inches feels cramped; deeper than 20 inches usually requires a back cushion propped against the window sill to sit comfortably. Accessible built-in benches follow a 20–24 inch standard per U.S. Access Board guidelines.
Can I build a window bench over a floor vent or heating register?
Yes, but the vent must be redirected — not covered. Build a channel that routes airflow to a louvered grille cut into the bench front. Blocking the vent entirely disrupts airflow balance, increases HVAC static pressure, and can lead to moisture issues over time.
Do I need a building permit to add a window bench with hidden storage?
Most jurisdictions exempt non-structural cabinetry from building permits — in Utah, most municipalities treat cabinet installation as permit-exempt work. However, if your build requires moving an electrical outlet or rerouting HVAC ductwork, those trades typically require separate permits. Check with your local municipality before starting.